Some Halloween decorations feel truly timeless – the kind your mom had on the mantel when you were little, and that you now want to recreate for your own kids. Starched cheesecloth ghosts are exactly that. They have a classic, slightly spooky charm that fits just as well in a modern farmhouse entryway as they do on a creaky Victorian porch. Best of all, they are genuinely easy to make, shockingly inexpensive, and a wonderful project to tackle with children of almost any age.
What You Will Need
Before you get started, gather everything together so the project flows without interruption. Here is your full supply list:
- Cheesecloth – pick up a few yards so you have plenty to work with
- Liquid starch – this is what gives the ghost its shape and rigidity
- Small balloons – these form the ghost's head (a styrofoam ball works equally well)
- A mason jar – the size determines how tall your finished ghost will be; a medium jar is a good starting point
- Two pipe cleaners – for the arms
- Craft googly eyes
- Black felt – for cutting out the ghost's eyes
- Black cardstock – for the optional Halloween bunting
- Black and white baker's twine – handy if you want your ghost to hold a little Halloween bunting
- Sewing needle – for threading the twine through the cheesecloth when attaching the bunting
- Craft glue or hot glue gun – for attaching googly eyes or felt eyes to the finished ghost
- Scissors – for trimming the cheesecloth and cutting out eye and bunting shapes
- A large bowl – for soaking the cheesecloth in liquid starch
- A cookie sheet lined with parchment paper or foil – to protect your work surface while the ghost dries
Building the Ghost Form
The first step is constructing the inner armature that gives your ghost its recognizable silhouette. Blow up a small balloon until it fits snugly into the mouth of your mason jar, with the top of the balloon extending upward to become the ghost's head. You want a rounded dome shape peeking above the jar's rim – that is the skull beneath the cheesecloth.
Next, take your two pipe cleaners and secure them to the top of the jar. Lay one end of each pipe cleaner under the jar's lid and screw the lid down over it to hold everything firmly in place. Once they are anchored, bend the pipe cleaners outward and slightly forward, dipping them gently in the middle so they mimic the drooping, outstretched arms of a hovering ghost. This small curve makes a surprising difference – the arms look far more lifelike and eerie than if you leave them perfectly straight.
Set the whole form on your lined cookie sheet. You will thank yourself later when the starch drips and dries and you are not scrubbing your countertop.
Draping and Starching the Cheesecloth
Cut a piece of cheesecloth and drape it loosely over the form before you soak it – this gives you a chance to judge the length and proportion you want. Let the fabric pool naturally at the bottom in front and back, and let it fall over the pipe cleaner arms. Once you are happy with the size, remove it, trim any excess with scissors, and then submerge the entire piece in a bowl of liquid starch.
Work the starch into every part of the fabric, making sure it is thoroughly saturated. Then squeeze out the excess – not so aggressively that you wring it dry, but enough that it is not dripping heavily. Drape the wet cheesecloth back over the form, this time arranging it exactly how you want it to look when hardened. Smooth the arms into position, fan out the base, and make sure the front panels fall in a way that pleases you.
Then simply leave it alone. Active hands-on time for this project is short – most of the wait is drying time, which can take several hours or overnight depending on your humidity level. Do not rush it. The cheesecloth needs to harden fully before you remove it from the form, or it may lose its shape.
Finishing Touches That Make All the Difference
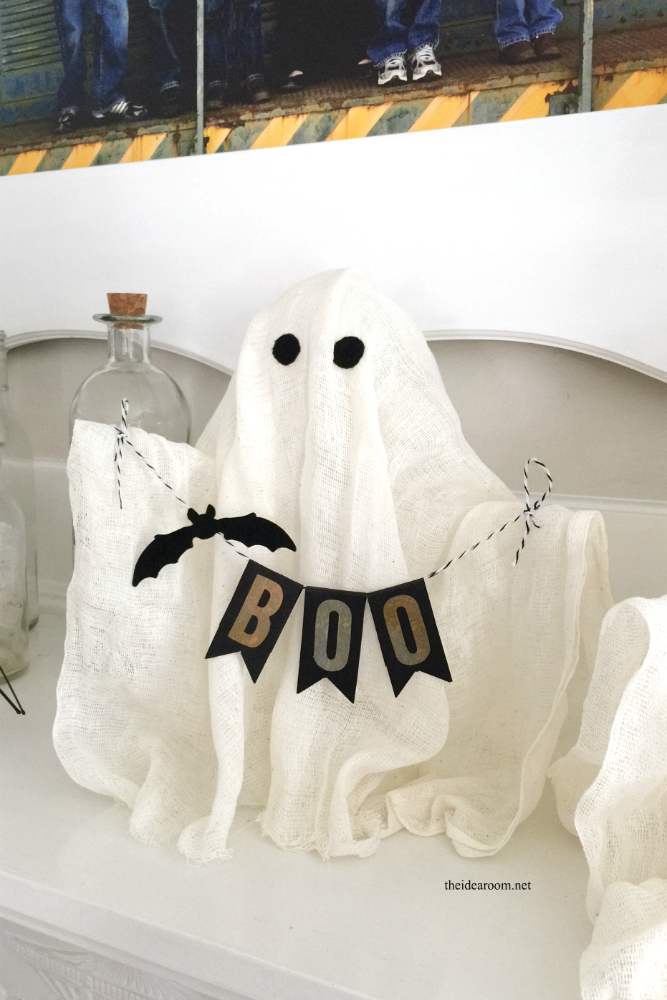
Once your ghost is dry and holding its form on its own, it is time for the details that bring it to life – or rather, to un-life. Use craft glue or a hot glue gun to attach a pair of craft googly eyes, or cut oval shapes from black felt for a flatter, more graphic look. Either works beautifully.
If you want to give your ghost a little personality, create a tiny Halloween bunting from black cardstock and thread it onto a length of baker's twine. Thread a sewing needle with the twine, poke it carefully through the cheesecloth at each hand position, and tie a small looped knot at the end so the twine cannot pull through. Your ghost can then appear to hold a cheerful spooky banner between its outstretched arms – a wonderfully whimsical touch.
Tips for Getting the Best Results
- Use multiple layers of cheesecloth if you want a fuller, more opaque ghost with a thicker body.
- If your ghost begins to droop after a few days, a light spray of fabric stiffener will revive its shape.
- Attach a length of fishing line to the top before the starch dries completely if you plan to hang them from a tree branch or porch ceiling.
- Store them carefully in a box with tissue paper between each ghost and they will last for many years of Halloweens to come.
A Decoration Worth Revisiting Every Year
There is something deeply satisfying about a Halloween decoration that costs just a few dollars in materials, involves the whole family in the making, and then gets pulled out of storage year after year like an old friend. These cheesecloth ghosts fit that description perfectly. Whether you arrange them on a mantel, cluster them on a bookshelf, dangle them from your front porch, or prop them up among potted mums in the garden, they bring a gentle, nostalgic eeriness to any Halloween display.
They are the kind of craft that becomes a tradition – the sort of thing children will remember making, and very possibly want to make with their own kids someday. And really, is there a better endorsement for any Halloween project than that?